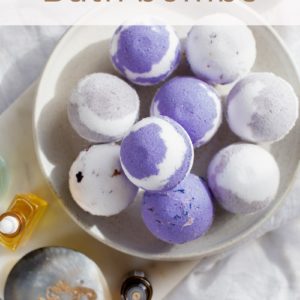
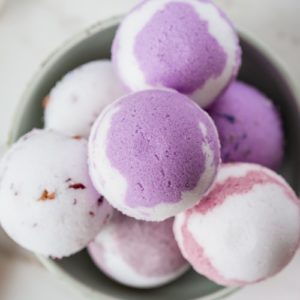
Enjoy a luxurious bath with this easy bath bomb recipe – just add essential oils to help melt away stress and tension. Bliss!
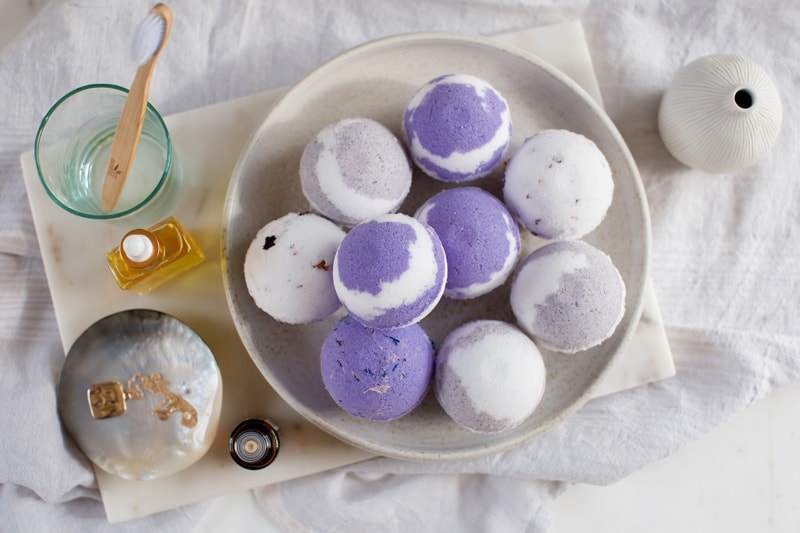
If you’re after a tried and tested, easy bath bomb recipe – look no further. Half an hour in the kitchen and you’ll have enough bath bombs for one luxury soak a week, for 7 weeks!
This may sound unusual – but I often prescribe sacred bathing to my clients in clinic. Sacred bathing was introduced to me by a Shamanic practitioner, and I’ve been an advocate ever since.
Essentially – sacred bathing is a form of self-care, to love and nurture the feminine body. It’s not just about taking a bath – it’s about using the portal of ritual to transform the experience into something truly sacred.
To do this – intentionally curate a few key ‘ingredients’ so to speak – salts from the sea, essential oils, flower petals, candles, crystals, a herbal bath sachet, a handmade bath bomb…
A little something to nod to each of the elements, and engage each of the senses.
Pure, restorative alone time (and a ‘do not disturb’ sign on the door wouldn’t go astray either).
With that in mind, today’s share is an easy bath bomb recipe – infused with essential oils to melt away tension and help you relax.
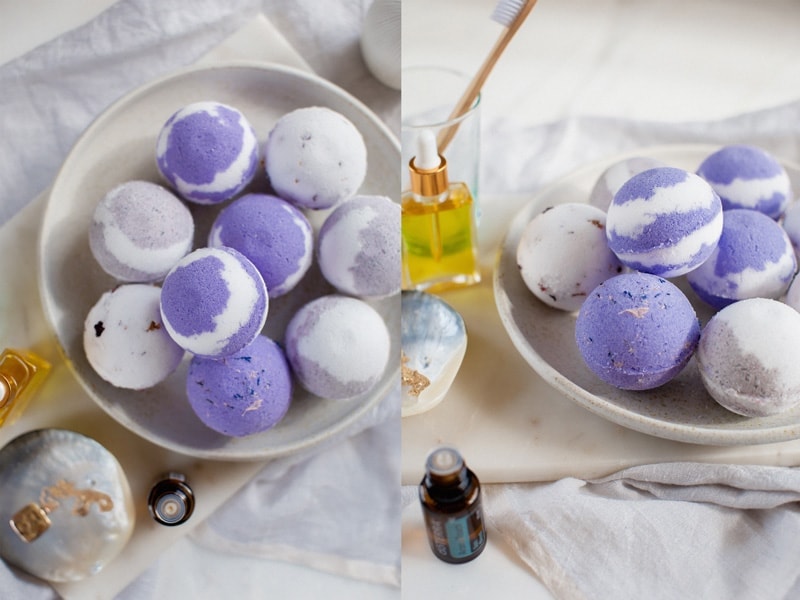
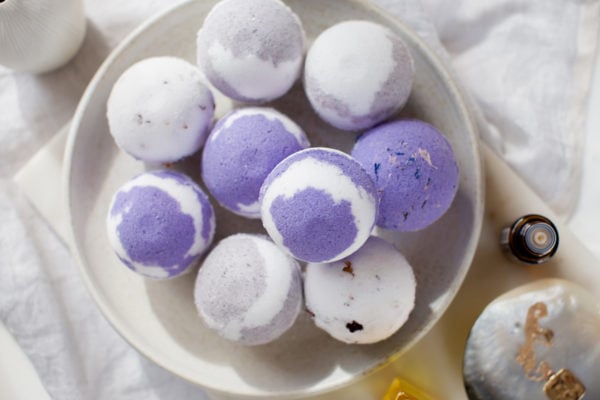
These would make a gorgeous DIY Christmas gift – just pop in a glass canister and tie with a ribbon. For Easter, you could use smaller bath bomb molds, pastel coloured powders to colour, and place in an egg carton. Cute right?
[bctt tweet="Tried and tested, easy bath bomb recipe - your bath awaits! Step by step here." username="laurenglucina"]

Bath Bomb Ingredients
- Sodium bicarbonate AKA baking soda
- Citric acid (to give the fizz)
- Tapioca starch
- Epsom salts
- Fractionated coconut oil or other liquid at room temp oil (almond, apricot kernel…)
- Mica powder to colour, or a selection of powdered fruits for their natural pigments
- Essential oils to scent and add therapeutic benefits, a few of my suggestions:
- doTERRA AromaTouch: minty, herbaceous, fresh, this blend smells like a day spa, it lessens tension after a long day
- doTERRA Lavender or Lavender Peace: lavender is calming and prepares you for sleep – while Lavender Peace is a blend of lavender with additional oils to help relieve stress and tension
- doTERRA Citrus Bliss: a blend of citrus with vanilla, to uplift and just smell darn good
Bath Bomb Equipment
- Scales
- Gloves: citric acid can be a minor skin irritant, gloves are a must, and please avoid any getting into your eyes
- Sieve
- Mixing bowl or two
- Bath bomb molds: these come in a few sizes - I have to say, I find the smaller ones easier to manage, but the bigger sizes are most impressive
How to Make the Perfect Bath Bomb
Bath bomb noobs – the following step-by-step guides you through making a multi-coloured bath bomb. If you're brand new to this - you might like to keep things simple and stick with one colour until you get the hang of filling them.
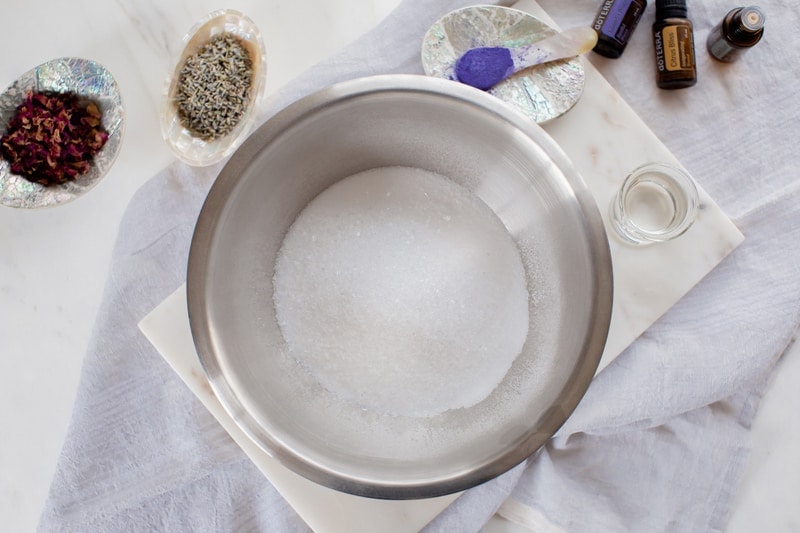
Step 1. Start by weighing out then sifting your all dry ingredients together, excluding the colouring agent (baking soda, citric acid, tapioca starch, Epsom salts).

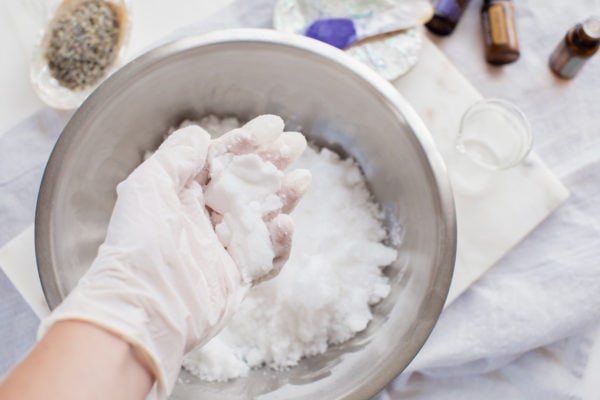
Step 2. Now weigh out your fractionated coconut oil, and add essential oils of your choice. Pour the oils over the dry ingredients, then us your hands (gloves on please!) to bring the mixture together, but don’t overwork it. You’re after something that resembles wet sand, holding its shape when pressed together.
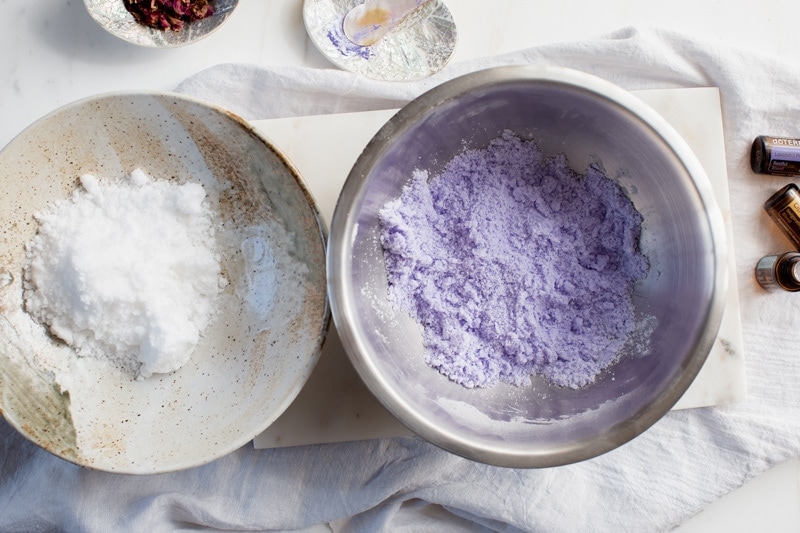
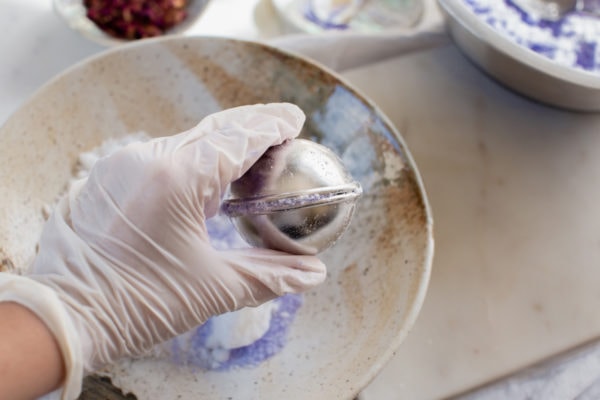
Step 3. Divide the mixture into two separate bowls, then add your colouring agent to either one or both.
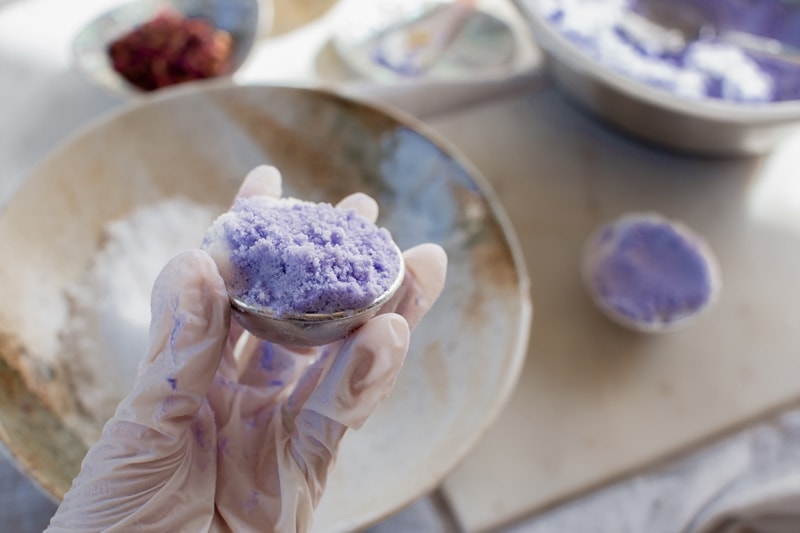
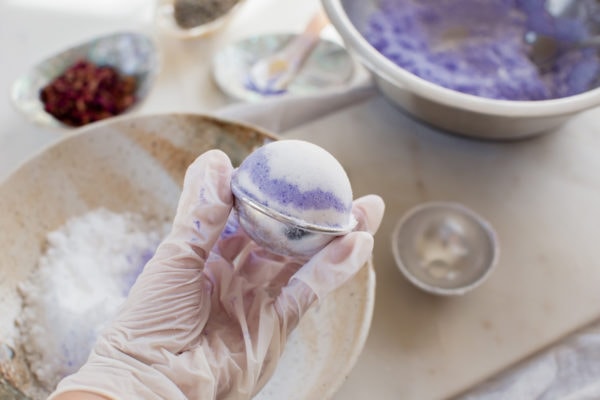
Step 4. And now we fill! Take half a bath bomb mold, add a small spoonful of one mixture, then gently pat it down, then a spoon of the other mixture, gently pat that down too, and so forth, until the mold is slightly rounded and over-filled.

Step 4. Repeat with the other half, then bring them together, and press firmly. When you bring the halves together, they should be so full that it takes a little bit of a squeeze to get the halves to meet.
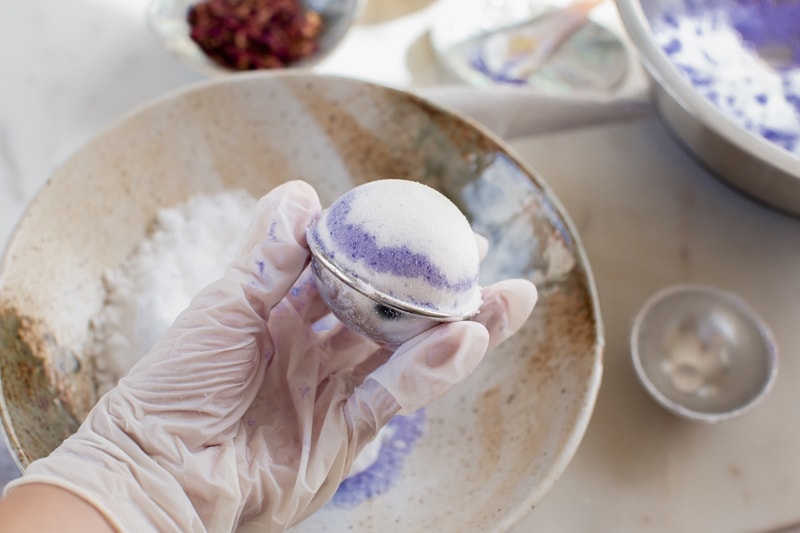
Step 5. Tap the top half with the back of a spoon, then remove. Repeat on the other side.
Step 6. Repeat until you’ve used the entire mixture up.

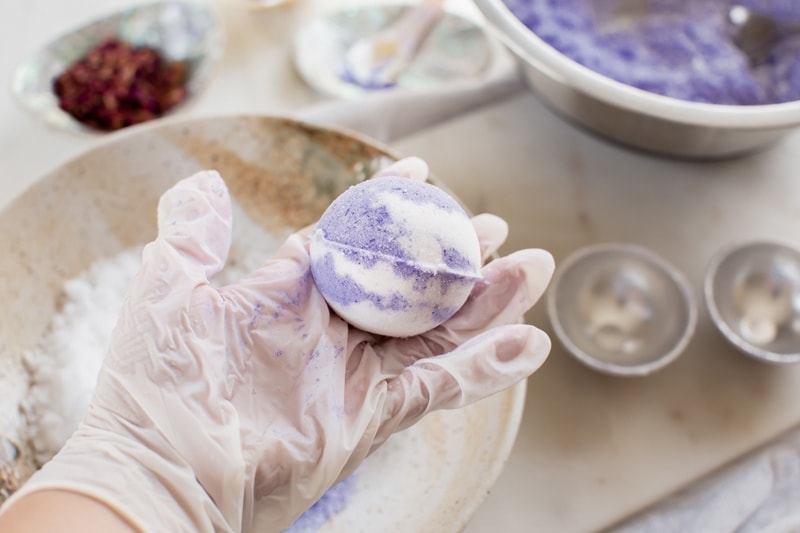
Step 7. From here – you can either transfer to an airtight container and allow a full 24 hours to set, or, you can place them on a tray in the middle rack of the oven, set to low/warm (<50˚C/122˚F) for four hours.
Done! Glorious, Goddess bath time awaits.
Questions, Questions
Why are my bath bombs falling apart? It’s either due to the texture of your mixture or the technique of your filling. Firstly, the texture should feel like damp sand, and hold together when pressed. Secondly, a common mistake when filling is to pack the mixture in tight before you bring the two halves together. Don’t do that - fill it evenly, gently pat it down, then add some more. The over-filling is essential - and when you press the two halves together, it will compact nicely and come apart easily. Follow both these points and I can promise you no fail bath bombs galore!
Why won’t my bath bombs join when I pull the mold apart? Most likely, they’re over-filled, and the mixture has been compacted too hard. Start again, and go a little easier.
Why do my bath bombs look good at first, then spread out like cookies in an oven? Yep, been there. Many recipes call for witch hazel or a spritz of water - I think it’s totally unnecessary - the bath bombs need to be completely dry (aside from the oil), otherwise they’ll eventually start to fizz, hence the spreading mass.
How long does it take bath bombs to harden? Impatient one, typically overnight, but I bring good news - you can speed the process up by placing them on a lined oven tray and leaving them in the oven set to ‘warm’ (about 50˚C/122˚F) for about four hours.
Where can I find essential oils? From me beautiful! I highly recommend gifting yourself a wholesale membership with doTERRA, so you can enjoy wholesale pricing like I do (25% off retail) for an entire year, via your own login. By joining via me, you’ll of course also receive my personal support for ongoing education. You can read more on how to join here. Please flick me an email to find out what the monthly specials are.
If you make and enjoy this recipe, please leave a rating below. And better yet – leave me a comment to tell me how you got on, or just say hi – I LOVE hearing from you. Follow me on Instagram, Facebook or Pinterest to see more of my everyday recipes and wellness tips.
If you’d like to chat with me about essential oils, or book in a class, you can do that here. If you’re after a Naturopathic consult, read more here.
Easy Bath Bomb Recipe
Equipment
- Gloves
- Digital Scales
- Sieve
- Mixing bowl
- Small bowl to weigh ingredients in
- Large bath bomb molds
- A couple of spoons
Ingredients
- 560 g sodium bicarbonate baking soda
- 280 g citric acid
- 40 g tapioca starch
- 60 g Epsom salts
- 100 g fractionated coconut oil or, almond oil, apricot kernel oil, macadamia nut oil
- 40 drops total essential oils if you have doTERRA oils - AromaTouch / Lavender Peace / Citrus Bliss, otherwise lavender, cedarwood, chamomile, ylang ylang...
- 3 g bath-safe mica powder (about 1 scant teaspoon) or, freeze dried berry powders
Instructions
- Start by weighing out then sifting all your dry ingredients together,
excluding the colouring agent (baking soda, citric acid, tapioca starch, Epsom salts).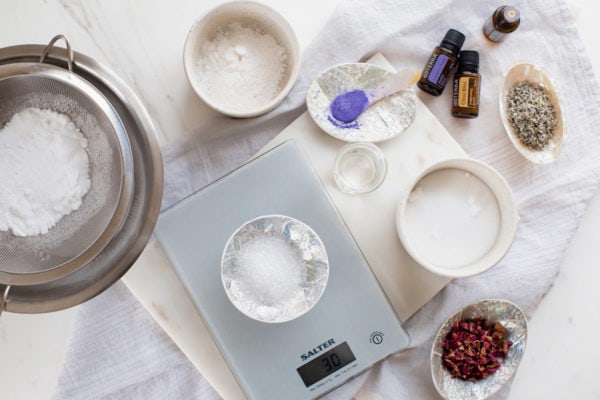
- Weigh out your fractionated coconut oil, and add essential oils of your choice. Pour the oils over the dry ingredients, then us your hands (gloves on please!) to bring the mixture together, but don’t overwork it. You’re after something that resembles wet sand, holding its shape when pressed together.
- Divide the mixture into two separate bowls, then add your colouring agent to either one or both.

- Take half a bath bomb mold, add a small spoonful of one mixture, then gently pat it down, then a spoon of the other mixture, gently pat that down too, and so forth, until the mold is slightly rounded and over-filled.

- Repeat with the other half, then bring them together, and press firmly. When you bring the halves together, they should be so full that it takes a little bit of a squeeze to get the halves to meet.
- Tap the top half with the back of a spoon, then remove. Repeat on the other side. Repeat until you’ve used the entire mixture up.
- From here – you can either transfer to an airtight container and allow a full 24 hours to set, or, you can place them on a tray in the middle rack of the oven, set to low/warm (<50˚C/122˚F) for four hours. Done! Add one bath bomb to your bath once filled.
Notes
- If your bath bombs fall apart, It’s either due to the texture of your mixture or the technique of your filling. Firstly, the texture should feel like damp sand, and hold together when pressed. Secondly, a common mistake when filling is to pack the mixture in tight before you bring the two halves together. Don’t do that – fill it evenly, gently pat it down, then add some more. The over-filling is essential – and when you press the two halves together, it will compact nicely and come apart easily. Follow both these points and I can promise you no fail bath bombs galore!
- If your bath bombs don't hold together when you pull them apart, they’re over-filled, and the mixture has been compacted too hard. Start again, and go a little easier.
- If your bath bombs spread out like cookies in an oven once you've made them, it is because they have been exposed to water somewhere along the way, so have started to fizz.
- You can use good old ice cube molds if you cant source bath bomb molds
- Bath bombs need to be kept in an air tight container. They should last around 6 months.
Ask me anything